- You should have a base understanding of CSS. What it is, how it is used, and why it is used.
- You should know the two main ways of implementing CSS:
- Internal Stylesheets
- External Stylesheets
- You should understand divs and spans. And should definitely use them!
- You should be able to position divs anywhere you desire on the screen.
- You should master the following properties:
- background-color
- background-color
- color
- font-size
- text-align
- position, left, & top
- width & height
- You should be able to implement RGB colors.
This is the end of the road for CSS, next is JavaScript. If you feel completely lost, go through lessons 6-9 again and TRY
IT FOR YOURSELF. That isn't me screaming, but emphasizing that you will understand it so much quicker if you try it for yourself.
If you actually test out the material on your own, you will see it in action and will grasp it much quicker. Seriously. Also,
seek out other tutorials, web-articles, and web-sites that take each property and value into deeper depth. I extremely
encourage this. Before we dive into JavaScript, let's learn just a few more styling tips.
Before we move on, let's learn a few styling tips. We will look at custimizing tables and lists.
When styling tables with CSS, you can style each part of the table seperately. What this means is that
each tag (table, tr, td) can have its own styling. As stated before, the styling that is embedded the
deepest will override any styling discrepencies.
Here is an example of some table styling:
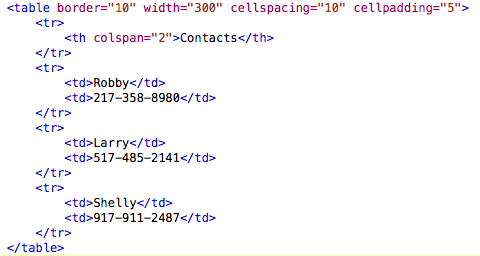
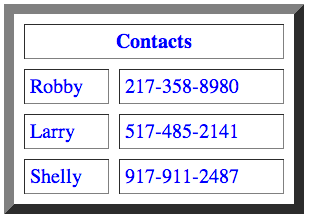
If you want to title the comlumns or rows of your table, instead of making a table-data tag, make a table-header
tag. The code word for this is "th". Any text typed in between table hearder tags will be centered and will be bold.
If you desire a cell of your table to span across two columns instead of one (maybe for a title),
insert the attribute "colspan" (meaning column span) inside of the opening "td" or "th" tag and set it equal to
the number of columns you wish to span it across.
Here is an example of a table header and colspan in use:
One way you can style a list is by changing the type of bullet-points it uses. The property "list-style-type"
is used to do this. You can give this property a value of square, circle, or katakana. If you are not satisfied
with one of these options, you also have the option of inserting your own image as the bullet-point. To do this, use
the property "list-style-image" and give it a value of url(filename.png). If you want a list, but do not want bullet-points,
set the value of list-style-type to "none." This will eliminate any bullet-points.
This page was constructed by Isaac Duke, a student of Anderson University, for an independent study in web programming.
This is not a fully comprehensive primer, so use in conjunction with other resources (resource page provided). The last
time this site has been updated was on August 20, 2013. If any questions, email misaacduke@gmail.com


