CSS stands for "Cascading Style Sheets." It is a feature in XHTML used for the designing
side of creating a webpage; it can make a page look welcoming, professional, and state-of-the-art.
CSS allows a web programmer to make "stylesheets," which are packets of name & value pairs directed to,
in most cases, a specific type or group of elements. For instance, if you want all of your text inside of
paragraph tags to be 15 pixels tall and black, while all your links to be orange and 11 pixels tall, you would be able to
specify this through CSS. CSS is also how you can customize the locations of objects/elements on your page. There
is a lot that can be accomplished with the use of CSS, so let's get started.
CSS can be implemented three different ways:
- Inline
- this is CSS inserted in the lines of code you want it to effect.
- Internal stylesheet
- this is CSS inserted in the head section, which can effect the whole page.
- External stylesheet
- this is CSS located in a different file, which can be called upon by all your pages.
We will not learn about inline because it is not as useful overall as the other two. Inline is only applied to one single element at a time,
so it is a lot more effective and time efficient to use internal or external stylesheets.
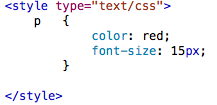
Internal stylesheets are embedded in the head section of your .html document. All of your CSS code will be typed out in between
opening and closing "style" tags. There is also an attribute you must add inside of the opening "style" tag. Simply type: type="text/css". It is the exact same every time.
It should look like this:
After you have the shell complete, you may now declare what elements you want to effect. Simply, type the element name
(the code word, such as p, h1, or img)(this will be called the selector), and then follow it with an opening and closing curly bracket "{ }". Inside the curly
brackets, type what property you want to customize of said element. Just like properties from before, there will be name and value pairs,
but the format will be a little different. You will follow the property name with a colon, then enter the value, and then end it all with a semi-colon.
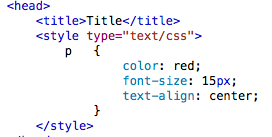
Like this:
To customize another element, simply enter to the next line and follow the same format.
Customizing Your Page Elements
Each element has four features. These are:
- Content
- Content is, simply, the data you insert in your tags. Such as the text, image, link, etc.
- Padding
- Padding is the area that surrounds the element (like when you highlight over it)
- Boarders
- The border is the part that outlines the padding. It has 3 properties that need to be
set in order to make it: border-color, border-width, and border-style (dotted, dashed, solid, etc).
You can also set the 4 different sides to different values.
- Margins
- The margin is the space outside of the border (the padding does not change!). So if you want
less space between your paragraphs, set a pixel amount. "margin:10px" will change all the sides of
the element to 10 pixels. "margin-left:" and etc will change only that side.
Many CSS properties are common across all elements. When it comes to dealing with text, here are some common properties:
- color
- font-size
- text-align
- font-family
When you use the color property, you are changing the color of the text. You can set it equal to nearly every
normal color. If you would like to explore your color options, google it, there will be many resources.
Font-size, which is also obvios, will change the font-size of your element. Just set it equal to what ever pixel size you desire. (check images above for example)
Text-align allows you to set your text as left justified, centered, or right justified (it is left by default).
Type: text-align: word; (and replace word with "left", "center", or "right" depending on what you desire).
Font-family, is a way to change the style of font you are using. You will probably have to add a link in your
header to google-fonts to accomplish this. You can search for this on your own as we don't want to veer off our main
focus.
External stylesheets are the most effective way to customize the look of your entire website. If you use an external stylesheet,
which I highly recommend, you will store all of your CSS styles in a sperate file (located in the same folder as all your .html documents).
This separate file will be saved as a ".css" extension rather than a ".html" extension, and will contain only your CSS, in the same
format as it would be in your header. There are no tags are head or body, just list your selector (the element, such as p),
and then all your name-value pairs inside curly brackets. It is very simple. I recommend saving it as "rules.css".
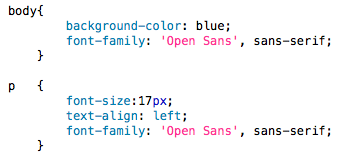
It should look like this:
Notice, in the image above, that you can even customize the body as a whole. So the whole color of the page will be blue,
and everything displayed on the page will be the chosen font. When you link to this page in your ".html" files (as you will learn to do in a second),
every single file will be effected by this. So, when you want your pages to look similar and have the same set-up from page to page, external CSS is ideal.
It is also very helpful for when you want to make changes at some point. Instead of fixing something one page at a time, you can open one file, make your desired
change, and voila, easy-peasy-lemon-squeezy.
To call for the CSS you have coded in a separate file, you must create a link to it in your head section of your ".html"
document. To do this, create a link tag (no closing tag, just an opening tag), and then insert three attributes:
- rel="stylesheet"
- type="text/css"
- href="rules.css"
The first two should always be the same, but the third one is an actual link to the file, so if you name your CSS document as
"rules.css" then you are fine, but if you name it something else, then just insert that file name in the place of "rules.css".
*Make sure that your .css file is in the same folder as your .html files!*
This page was constructed by Isaac Duke, a student of Anderson University, for an independent study in web programming.
This is not a fully comprehensive primer, so use in conjunction with other resources (resource page provided). The last
time this site has been updated was on August 20, 2013. If any questions, email misaacduke@gmail.com


