welcome

Web Programming Primer

-Lesson 2-


Fundamental Tags: It's all about tags

Paragraph Tags

One of the main tags that you will use are paragraph tags. Paragraph tags are used (inside the body) to contain the text you want to be displayed on the web page. To make a paragraph tag, use the carrots, as we learned in lesson 1, type a "p" as the code word, and then do the same for the closing tag, making sure not to forget the backslash "/" before the p. You will then type whatever text you want to appear on the screen inside of the two tags.
Let's put this into action and test what we have learned. Type the minimum requirements for the webpage onto a new document in your text-editor. Take a look back at the end of lesson 1 to review the minimum tags if you need to. After you have the minimum page requirements, type the opening and closing "p" tags inside the body tags. Inside of the new paragraph tags, write a short sentence or word.


It should look something like this:


After that, right click your file and open with your web browser, it should open and display what you typed. (Click for help)


Like this:


Congratulations, pat yourself on the back, you have just created your first page. Now let's learn some more tags.

Link Tags

The link tag is possibly the most important tag you can learn. It is what can bring your text to life; make it hypertext. It is created just like every other tag (with the carrots, as mentioned previously). The word, or in this case, the letter that you must type inside the carrots to make a link tag is an "a."

This is what a set of opening and closing link tags look like:

Okay, now we have an empty link shell, so now we need to fill it. This may get a little confusing, but just hang with me. Between the opening and closing tags, type a word or sentence. In my case, I will type "google." Now we have a word that will appear on the webpage, but it is still just a static word until we tell it where to link to. So, inside of the opening link tag, type "href" and the an equal sign, and then the web address of where you want to link to, inside of quotation marks. I will make my word "google" link to the google homepage.

It would look like this:

If you type this out inside your body section, or inside your paragraph tags, save it, and then open your file with a web browser, you should now have a working link. If you click on the word you made as your link, it should take you to the web address you typed inside your opening link tag. If it does not work, try again and use the example as a model.

Breaks and Horizontal Rules

As you may have noticed already, XHTML is white case insensitive. What this means is you can type as many spaces or enter to a new line a dozen times in your text editor, but when you load the page, it will not register these extra spaces. Test this out for yourself real quick to understand what I am talking about. No really, do it...
Type a word in your paragraph tags, then press the space bar 5 times, and then type another word. If you load your page, there will be at max 1 space in-between your words. The same thing will happen if you type a sentence, hit enter, and then type another sentence. The sentences will appear on the same line. This may seem a hinderance, and as a beginner, it kind of is, but let me now introduce to you two tags that will help you manage and format your paragraphs a little better.

First, we will learn about the "break" tag. You may have already guessed it, but the break tag is used to break to the next line. You may like to think of it as the enter button in your code. The letters "br" (which stands for "break") are what you type as the code word. The break tag, as well as the next tag we are about to learn, are exceptions to the rule I mentioned earlier. They do not have a second tag (closing tag). Instead, the opening and closing tag are squeezed together into one tag.

The break tag looks like this:

As you should have noticed, the forward slash is thrown in after the code word, and before the ending carrot. Since there is nothing we would possibly insert inside the break tags, it is shortened into a single tag. Also, note that the paragraph tags have a built in break mechanism. If you type some words inside paragraph tags, and then open a new set of paragraph tags after that, your second paragraph will be displayed on the webpage with a full line of space between the two paragraphs. Try this out real quick.


Next, we will learn about "horizontal rules." A horizontal rule is the line you see right above this text. It is used as a separator, or really as anything you want to use it for. It is just a cool, useful tool that you may use at some point. Like the break tag, the horizontal rule tag is also an exception because there is nothing you could possibly insert in between the opening and closing tags, so it is squeezed into one tag as well. It is the exact same format and it requires the letters "hr", which stands for horizontal rule.

It looks like this:


Image Tags

Lets spice things up just a little bit. No one wants a totally boring website with only text, right? So, let's learn how to display images on our page.

I hate to keep giving you exceptions, but the image tag is also a single tag. It is set up in the same fashion as before, with the code letters of "img", which stands for, you guessed it, "image." Inside of the image tag, we need to give the "address" (location) and name of the image file.


This is where it gets a little tricky, so pay attention. We are going to have to back-track a little bit to make sure we have everything in order, so that we can call for the image properly. Save your .html file to your desktop. (This is the document you are working on in your text-editor). After that, create a new folder on your desktop, name it something, like "Web," and then drag your .html file into your new folder. After that, copy the image you want to have on your webpage inside the same folder.

For more help, click here.


Inside of your image tag, type "src" (which stands for source), then type an equal sign, and then, in quotes, type the file name of the image. In my case, I will type "img_tag.png".

Most of the time, you will want to change the size of the image. To do this, simply hit space, and then type "height" followed by an equal sign and then a number followed by "px", inside of quotes. (Take a quick look at the image below for this to make more sense). Px stands for pixels, so you will have to mess around with different numbers to decide what works best in your situation. You can also replace "height" with "width" or use both properties if you desire.

Your image tag should look something like this:

Try this out for yourself. As I instructed earlier this lesson, find a picture you want to display on your page, put it in the same folder as your .html file, and then type the necessary code. After that, load the .html in a web browser and then see if your image loads. Mess around with the heigh and width properties as well to get a better understanding of them, and don't forget to include "px" after the number you use.

Complete Project 1

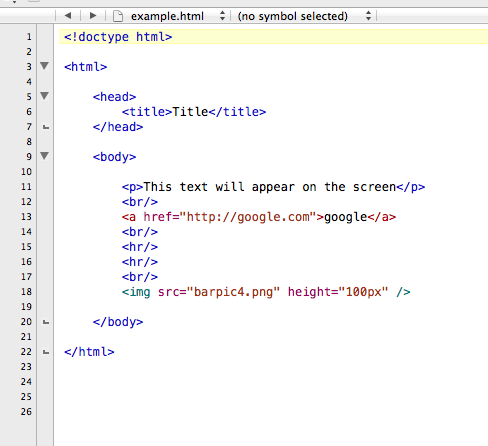
Let's put everything we have learned together. If you have followed along, you may be about done with project 1. If you havn't followed along, take a second to catch up and apply what you have learned. Open your text editor (or download one if you still havn't yet) and then code all the tags we have learned so far. Start with the bare minimum (the shell, so-to-speak). Check back in lesson one if you need to. Then add in paragraph tags with some text, a link, and an image. Also, throw in some break tags in between them to space them out a little. You can even add a horizontal rule if you are feeling bold and courageous.


It should look something like this:


As you may have noticed from my code, it is nice to space out your code onto different lines to make it less confusing. Also, note that I tab in each time I go deeper into a certain tag. For example, I inserted paragraph tags inside of the head tags, so I indented them. Anytime you embed anything inside of a set of tags, you should indent it all. This is not necessarily a rule, but is coding etiquette and will help you stay organized and more productive in the long-run. More on this.


When you open your .html file in your web browser, your first project should look something like this:


Lesson: 1 2 3 4 5

Back Next
This page was constructed by Isaac Duke, a student of Anderson University, for an independent study in web programming. This is not a fully comprehensive primer, so use in conjunction with other resources (resource page provided). The last time this site has been updated was on August 20, 2013. If any questions, email misaacduke@gmail.com