We have already dealt with attributes although you may not have been aware of it. Remember back (or look back) to
lesson 2 when we inserted a "src" inside of the opening image tag, when we inserted "href" inside of the the opening link tag,
or when we inserted "height" inside of the opening image tag. These are all attributes.
Attributes are inserted inside the opening tag
(between the code word and the ">"). The purpose of an attribute is to provide additional information about a specific element.
An attribute has two main parts: the name and the value. For example, we used the names src and height for the image element. Then we
set them equal to values. The value of the height attribute was "100px".
*quick note: the values are always inside of quotation marks*
There are usually many attributes available for each element. We will only go over a few at most for each element we learn about,
but just be aware that many more exist. You can always google attributes and learn more about them elsewhere too.
Some tags need attributes, like the link tag. The link must have a destination associated with it. This is what the attribute "href"
is used for and it stands for hyperlink reference. This isn't only how you can link to other websites, but this is how you link to other web pages on
the same website as well.
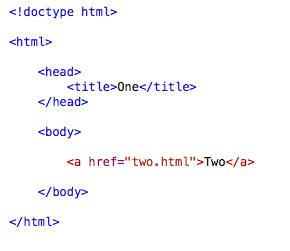
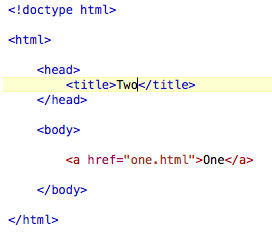
Test this out real quick. Create two .html pages, both with the minimum requirements for a page and save them inside of the folder on your desktop from Project 1. Save the first as "one.html" and the second
as "two.html". Then on the first one, make link tags embedded in the body and instead of a url, make the value of href the name of your file you want to link to, which should be "two.html".
Do the same for the second file, but make the link to "one.html". Inside of the link tags, write one on one and two on the other.
You should have something like this:
If you load one of these files in your web browser, the links should take you back and forth between the two pages.
There is also a "title" attribute for links. The title attribute makes a note pop up over the link if someone hovers over the link with their mouse.
To use the title attribute, type "title" as the attribute name, and set it equal to whatever your want to appear in the little pop-up box. Test this
out yourself to get a better understanding.
This is what it looks like:
We already covered the source "src" attribute for images. We also, touched on the height and width attributes, but
here is a quick, necessary note on these attributes: If you shrink an image using these attributes, you are not changing the
actual data size of the image, you are just changing the display size. This is important to remember because pictures
slow down the load time of your page, and you cannot fix this problem by changing the height attribute of your pictures,
you must change the actual size (and quality) of the images in an image editor before they even touch your site.
This is not too important for you to know right now, but could help you out down the road.
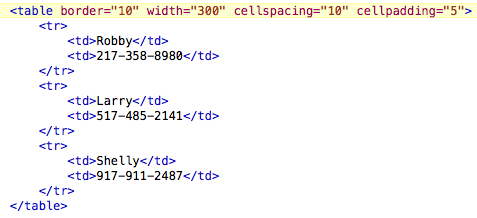
There are many attributes for tables, but we will only cover the most popular ones, the first of which is "border."
The border attribute gives you an outline around the rows and columns of your table; it helps separate all of the data.
You will set the border attribute equal to a number (like "1" or "2" most likely), which will determine the thickness of the very outer border.
"cellspacing" is another table attribute. It determines the amount of space between each box of data. Set cell spacing equal to a number as well (like "5").
"cellpadding" is similar in concept to cellspacing, but instead, it determines the space between the data itself and the inside of the data box it is in. Lastly,
"width" as you can probably guess, will change the total width of the table. Set width equal to a number (like "500"). The best way to understand all of this is to
mess with each attribute, one at a time, and look for what it does to your table. Take time now to study the effects of these table attributes.
A table with table attributes could look something like this:
This page was constructed by Isaac Duke, a student of Anderson University, for an independent study in web programming.
This is not a fully comprehensive primer, so use in conjunction with other resources (resource page provided). The last
time this site has been updated was on August 20, 2013. If any questions, email misaacduke@gmail.com


